
i-record App
Download & requirements
Initial registration
Language selection
Accepting the terms of use
Entering credentials
Selection of default WiDI
App structure
1 Hamburger menu
2 Main navigation
3 Context-specific menu
4 Context-specific functions
5 Back button (Arrow)
6 Context headline
7 Content
8 Functions
9 Connection to the door
Difference between closing the app and logging off the user (Logout)
Download & Requirements
The i-record app is free and available for Android devices (see minimum requirements). It can be downloaded from the Google Play Store.

In order to use the app, you must log on to the record server when you first log on and agree to the terms of use. For this purpose, an account is required on the website of the respective record subsidiary. Furthermore, the user and his WiDI must have been added to the same license pool and verified.
Initial Registration
When the i-record app is started for the first time, the user is automatically guided through an initial login, which initialises the application. Therefore you can find under the following link a video that shows the download and installation of the i-record app via the Google Play Store, as well as the initial registration.
The first login is simple, fast and consists of the following steps:
Language selection
First of all, the desired language must be chosen. Available languages are English, German and French.
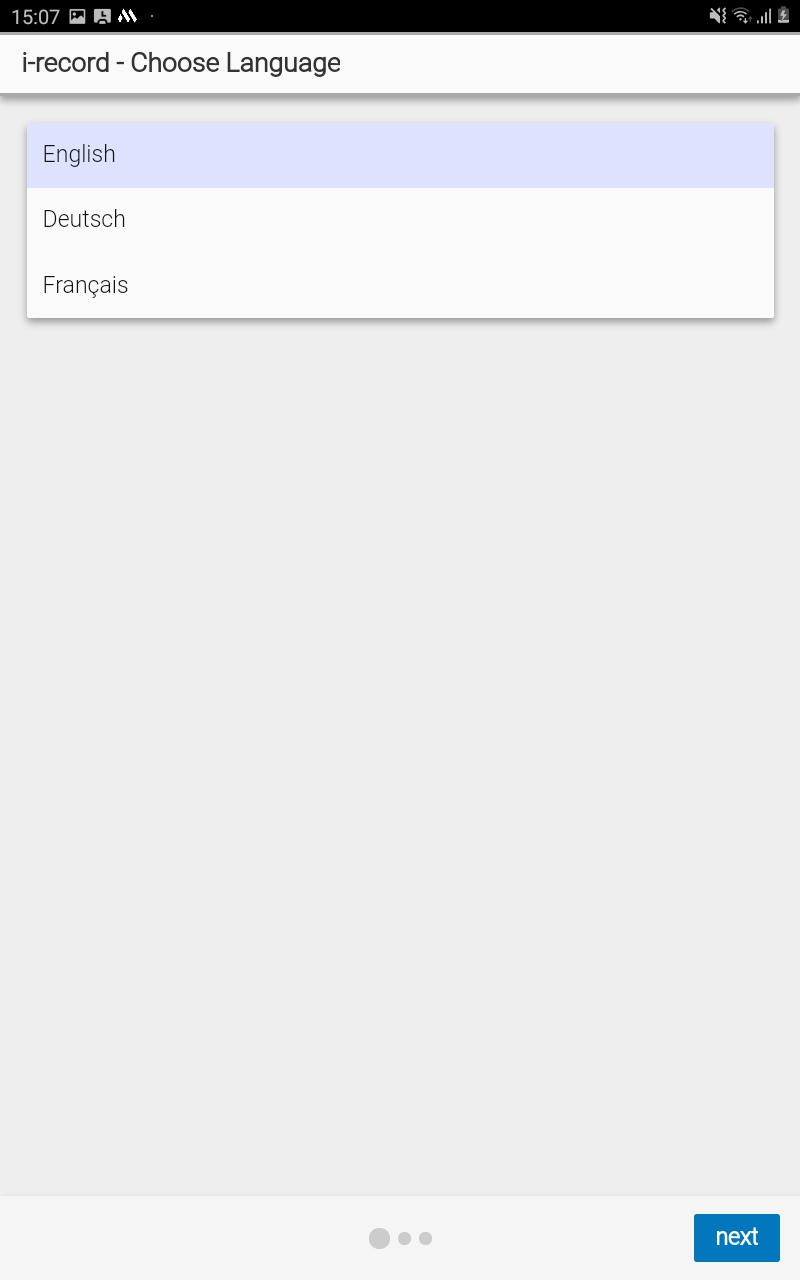
Confirm the selection with the "Next" button.
Accepting the terms of use
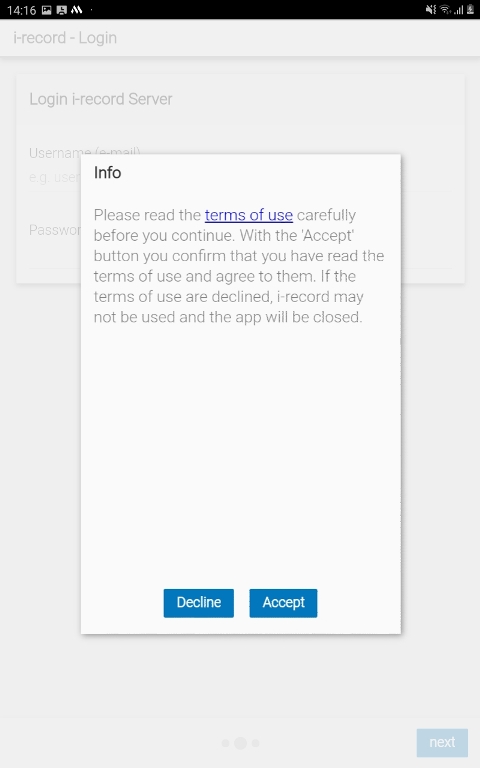
Entering credentials
The next step is to enter the access data (e-mail/password of the record website).

Confirm the entry with the "Next" key.
If the access data is correct, the app will connect to the i-record server. The required data, such as licenses and software update packages are downloaded. When this process is completed, the following message appears:
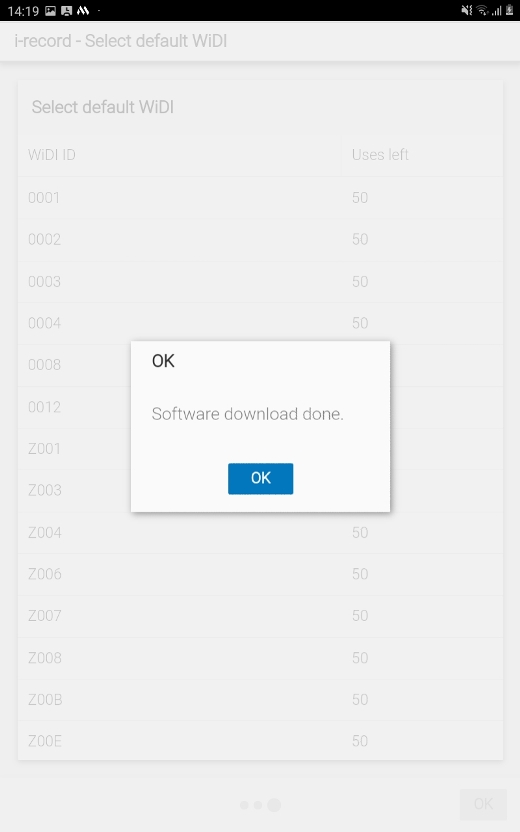
Confirm with the "OK" button.
Selection of default WiDI
For each WiDI in the license pool, the user receives a valid license with 50 door accesses. From this list, the own WiDI must now be selected as the default WiDI.
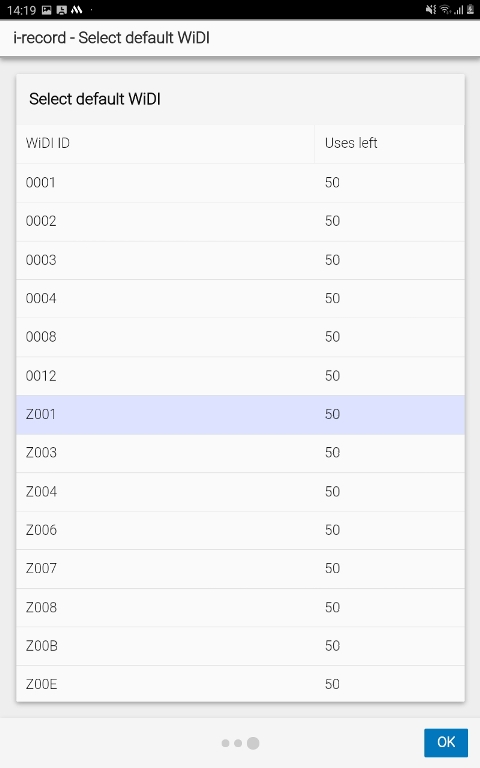
Confirm with the "OK" button.
The initial registration is now complete and the app is ready to use. The user can now connect to his WiDI and configure doors.
App Structure
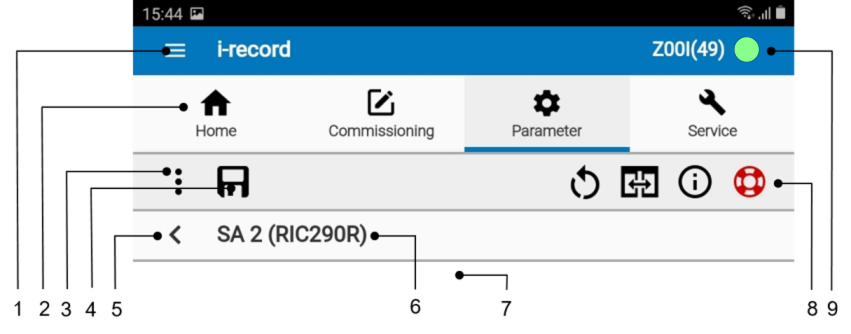
| No. | Description |
|---|---|
| 1 | Hamburger menu |
| 2 | Main navigation with the four main screens |
| 3 | Context specific menu |
| 4 | Context specific functions |
| 5 | Back to previous screen |
| 6 | Context headline |
| 7 | Content |
| 8 | Functions (always visible) |
| 9 | Button to connect to a door, incl. display of the standard WiDI with number of remaining door accesses and connection symbol. |
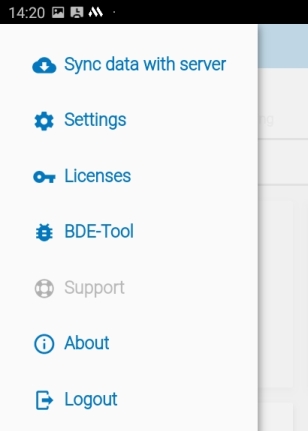
1 Hamburger menu
At the top left is the hamburger menu. The following functions are located here:
- Data synchronisation with record server: Download and update of data (only active if not connected to a door)
- Settings of the app
- Licenses: Listing of all WiDI licenses in the license pool including the remaining number of door accesses per WiDI
- BDE tool: Help function for error codes at the door.
- Support form: easy reporting of errors (only active when connected to a door)
- About: General information about the app including the version
- Logout: Logoff of the user (login data including licenses will be deleted)
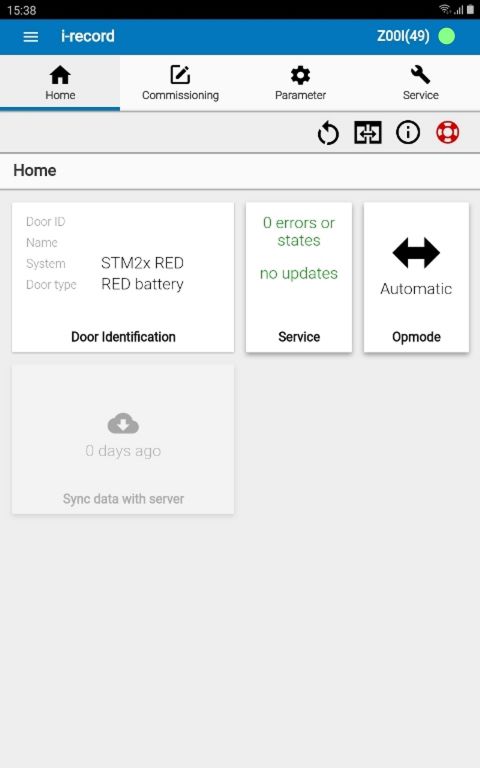
2 Main navigation
The main navigation with the 4 tabs allows you to switch to the four main areas at any time. These are:
- Home screen
- Commissioning
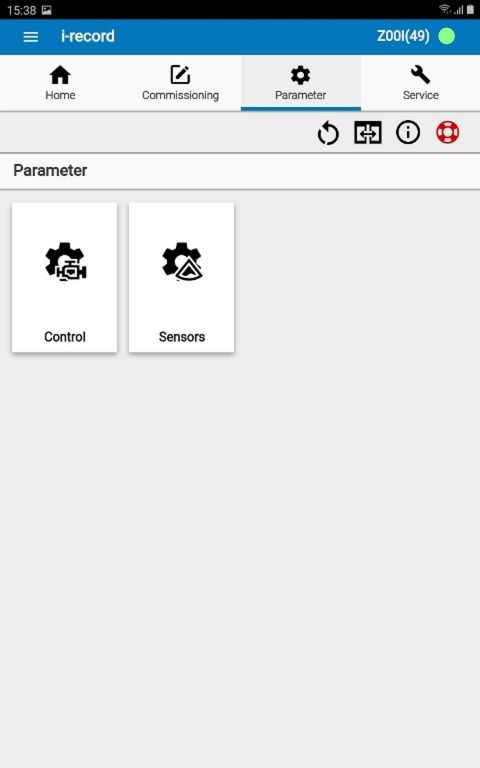
- Parameters
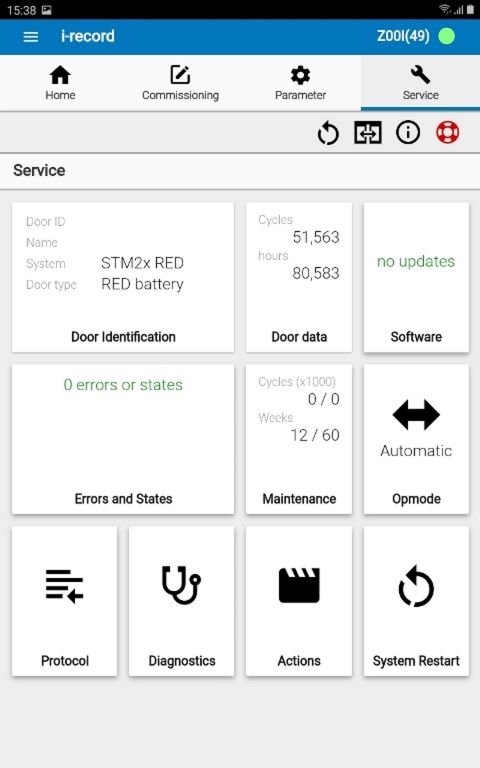
- Service
Each main area is structured with the help of tiles, which allow an easy jump to the desired function or context.
The home screen provides a good overview of the condition of the door. At a glance, central information of the connected door is visualized here, in particular the operating mode set, any errors, as well as existing, new software updates. If the i-record app is not connected to a door, only the tile for the data synchronization with the record server is active.
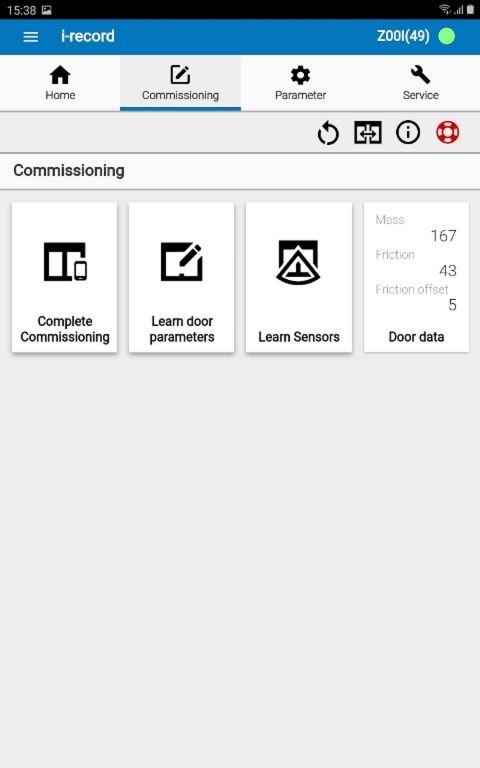
Under Commissioning you can choose between full commissioning (door and sensor learning), door learning and sensor configuration.
The door and sensor parameters can be configured under Parameters.
Finally, the service area has an important meaning for the technician. Here he has access to all information and functions required for service and maintenance. Here, among other things, door data, the status of the software, current errors, maintenance counters and the operating mode. In addition, the software can be updated, the protocol read out, the inputs displayed (diagnosis) and various other functions executed with only a few clicks.
3 Context-specific menu
With the help of the three dots, a context-specific menu can be called up. It contains functions for the currently context. For example, you can perform background learning for the sensors or set the sensor parameters back to the default or factory settings.

4 Context-specific functions
In the light grey bar, context-specific functions appear with which functions can be executed. For example, a memeory icon appears under Parameters.

If this icondisk is still grayed out, no parameter value has been changed in the current context. As soon as a new parameter value is entered, the colour of the icon changes to black. By pressing the icon, all changed values are first displayed in a window. If the user confirms the changes, all changed parameter values are stored on the controller.
A second example is the RED --> DUO or DUO --> RED toggle function that appears during software update. In case of a RED door the following icon is displayed:

If this icon is pressed, the current software update packages of a DUO door are displayed. By pressing the update icon "Update all nodes" ( ![]() ), the RED door becomes now a DUO door.
), the RED door becomes now a DUO door.
To change from a DUO to a RED door, press the following icon:

5 Back button (Arrow)
Below the bar with the context-specific functions there is an arrow icon that points to the left. This icon is used to return to the previous screen. For this reason, this button is called the "back button".
6 Context headline
7 Content
Just below the whole application header the content of the context page is displayed. These are for example the values of the parameters, the diagnosis of the inputs or the error list.
8 Functions
The following four functions (icons) are always present, as they must be executable at all times:
| Icon | Meaning |
|---|---|
 |
Restart of all CAN nodes |
 |
SSK: Key switch contact |
 |
Status / Information |
 |
Support form |
9 Connection to the door
The default WiDI is displayed in the upper right corner. The remaining door accesses of the current used license are shown in brackets. The symbol on the right shows the status of the Bluetooth® connection to the door. If the app is not connected to a door, a white plug is displayed:

To connect the app via Bluetooth® to the door, press the text or the plug. As soon as the connection is established, the plug changes to a green symbol.

The door can now be configured.
As you can see in the picture, the number of door accesses of this license has been reduced by one. There are 46 door accesses left before you have to connect to the record server again to update the license of this WiDI. Pressing again the text or the green symbol will disconnect the connection.
Difference between closing the app and logging off the user (Logout)
In the i-record app, a distinction must be made between the normal closing of the app and the menu item "Logout". If the i-record app is closed via the task manager view, the access data to the record server as well as all downloaded data incl. licenses will be kept. The next time the i-record app is started, the user does not need to log on to the record server again. He can therefore start working immediately.
The call of the task manager depends on the Android version and the mobile device. On many Android devices the task manager button is located in the lower left corner. On other models you have to press the home button in the bottom middle longer to start the task manager.
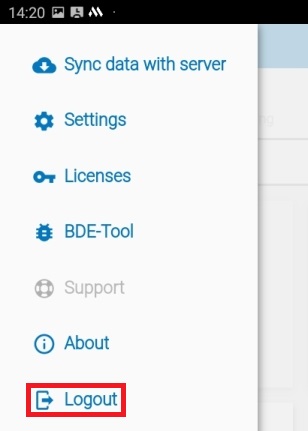
If the user chooses "Logout" from the hamburger menu in the upper left corner of the app, the user is permanently logged out of the application. Its locally stored data, such as login information an licenses, are deleted immediately. The next time the i-record app is started, an initial login must be carried out again.
The "Logout" function is intended either to change the user on the mobile device or to lock the app for unauthorised persons.
